Showing posts with label Teepee. Show all posts

Thursday, October 9, 2014

Our New Teepee With Fringes, Hand Prints, And Chevron Prints

Yaye! A new bigger Teepee is up in the house. Remember when I made this temporary Teepee for my little girl bee? Well, I promised my kids I was going to make them a bigger one, one that they both can fit in. And, a promise has been made. Behold! A new Teepee with fringes, hand prints, and chevron prints. Ta Dah! Eck! What do you think, guys? 

 photo IMG_5811_zpsad77c8f0.jpg

 photo IMG_5828_zps79eb747f.jpg

You want to ask me how long did it take me to finish the project? A couple of days. It took me two days because I had a little bit of an issue while sewing up the pieces of the Teepee. But nevertheless, my project is done and my kids are happy. And yes, they went to sleep for a couple of nights in their Teepee. I am telling you, it is nice and warm inside the Teepee. It holds heat pretty well and perfect for those chilly nights. 

 photo IMG_5829_zpsc3b94a5b.jpg

It is a simple construction that includes some hand prints from both of my kids and from my husband (the monster hand print in the middle). I free handed the Chevron prints on the bottom and those two initials on the top with the red star (as my little girl would call it) are stenciled using some leftover stencils from a previous project. The fringes are made from a faux leather that I got from a thrift store for cheap some years ago. 

Materials used for the project:

- Wood from Home Depot (don't ask me the measurement because I forgot) 

- Yarn 
(I forgot to get me some rope to tie the Teepee, but since I have some yarn in the house, I used that instead. If you want to make a teepee, it is best to use the rope to tie it. Or some leather strips. Or whatever you like to use to tie the wood pieces together. Just not the crochet yarn that I used. M'kay! I will replace it though.)

- Canvas Dropcloth- Home Depot (the one that is around $10 and there are two in a pack)

- Faux Leather for the fringes- thrift find 

- Stencils for the Initials and the Red Star Or Red Burst in the middle

- Painter's Pens (I used Black, Red, and Blue in designing the teepee)

And oh! The grey carpet is from Menards. It is one of those cheap Interior/Exterior carpet that I think we got for like $10. It is big, but I cut it up into a square for the floor of the Teepee. I also painted the edge with white paint. 

 photo IMG_5781_zps396809f8.jpg

 photo IMG_5782_zpsef653cd1.jpg

 photo IMG_5833_zps6f24e38e.jpg

 photo IMG_5830_zps6d9d3415.jpg

 photo IMG_5836_zps879f61aa.jpg

 photo IMG_5835_zps8cdc94d1.jpg

 photo IMG_5837_zpsf0a64f11.jpg

 photo IMG_5789_zps98d20cbd.jpg

 photo IMG_5793_zps291870cc.jpg
Did I say I made it for my kids? I guess daddy wants to play in the Teepee, too. The big kid couldn't resist. 
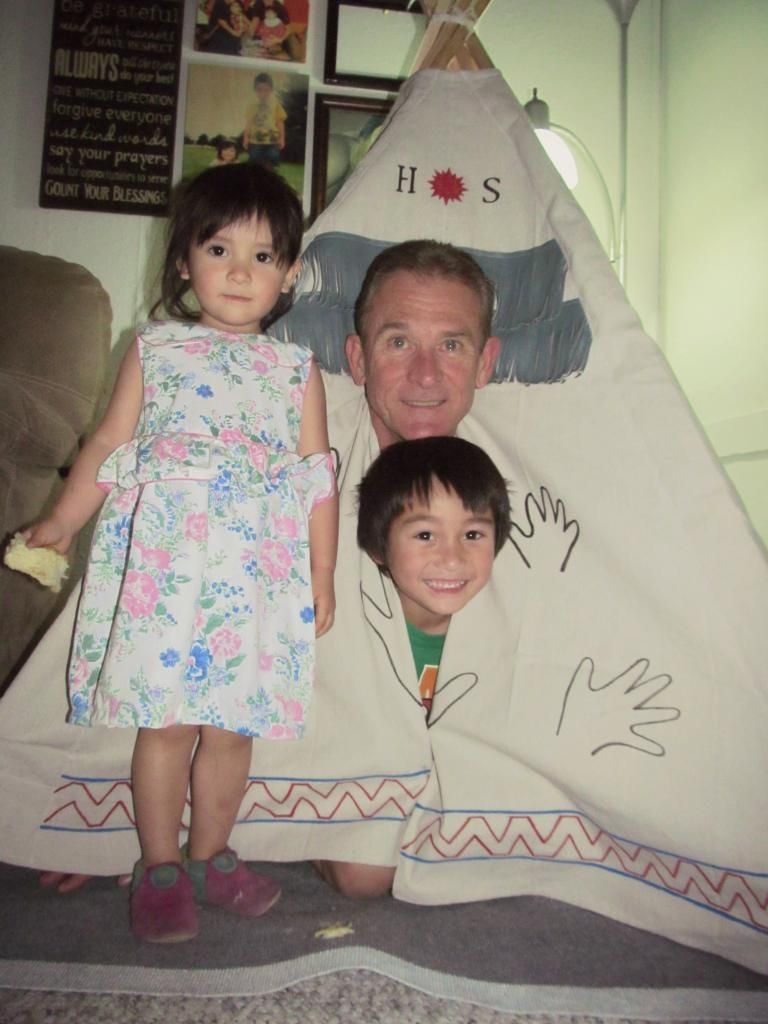
 photo IMG_5795_zps0afeb994.jpg

 photo IMG_5802_zpsb2139c23.jpg
One warm and cozy night in the Teepee. Have a great one, everyone!!! 

Thursday, September 18, 2014

Little Temporary Teepee For The Little Girl Bee

There is just something about a Teepee that makes kids (and kids-at-heart) excited. I was even excited to make my little girl her own little temporary teepee. I promised them last year I was going to make them one, but that didn't happen. This one is temporary because I am going to make them one that is big enough that will fit both of them. I will be using some canvas drop cloth for the big one and let my kids decorate it. I get so excited just thinking about it. Don't you? After I finished the teepee, my little girl invited me over to her room and asked me if I could read her some books in her teepee. It is so special and so sweet. In fact right now, as I am writing this, my little girl and daddy are in her room reading a book. She gets more and more excited about hanging out in her room now that she has her own teepee. 

The fabrics used on this project are rummage sale find from last year or a couple years ago. They were 25 cents per fabric so both the yellow one and the blue one are worth 50 cents. Awesome! I forgot how much the dowels were, but it was not that much. This project cost me about $10ish? 

No tutorials this time on this one because there is a sea of tutorials online now. It is easy to make, really. Maybe when I get the other big Teepee or tent done, I might have a tutorial on that one. I have already found the one that I want to make for my kids and I am excited! Thank goodness for Pinterest! Have you made one before? Do share! 

 photo IMG_5350_zps3dd47190.jpg

 photo IMG_5348_zpsd5def2df.jpg

 photo IMG_5341_zps94f0eba4.jpg

 photo IMG_5343_zps52243ea1.jpg
Reading stories to her stuffed toys. 

 photo IMG_5344_zpsb052dc9c.jpg

 photo IMG_5360_zps6da70694.jpg

 photo IMG_5346_zpsc248fecc.jpg

 photo IMG_5359_zps4c5ccd3f.jpg
Peek-A-Boo!!!

 photo IMG_5357_zpsd9bc148a.jpg

 photo IMG_5363_zpsea9f7a6d.jpg
Don't mind that big black paint stain on the carpet. Hopefully it'll get replaced, soon! Have a great one!

Wednesday, February 23, 2011

Scrap Teepee In the Making

What is a scrap Teepee? Actually, I just made it up, because the Teepee that I am building for my little boy is made out of scraps. I mean, it is not the traditional kind of Teepee because what I am doing is an inspiration from this photo that I saw online the other day. Immediately, I was inspired to do the same thing, and I thought that this was a better way to recycle those old clothes and use those scraps that you have laying around your house. Brilliant! All I did was to cut strips of fabric and then tie them up together and wrap it around the teepee frame. The frame is made out of hedge branches that we got for free from the farm and just trimmed of the nasty thorns and I tied up six of them on the top with a twine.


It just looks so unique and fun that it looks like a spider web to me so I wanted to do the same theme to this Teepee that I am making and so far this is what I have accomplished. Now don't worry about it looking so shabby for now because once I am done with it, it will be looking fine. I am sure my little HF will have fun playing in his Teepee. I can't hardly wait!


This Teepee is set right next to the Harley willow tree (yes, we named our three willow trees by our names) and right where I can see it from the kitchen so I can monitor him whenever he is outside playing.


The cold weather is back and it's really not ideal to work outside with your fingers freezing cold so it is nice to just wait until the weather starts to warm up again and perfect for spending time outdoors. So come by some time to check out the finished product. Hope you all had a great day!